

Integration within Microsoft Copilot
Connect Klaxoon to MS Copilot Studio
This guide provides a comprehensive, end-to-end walkthrough for setting up the Klaxoon Model Context Protocol (MCP) server within Microsoft Copilot Studio.
The steps we are going to follow here are to create an Agent in Microsoft Copilot Studio and configure Klaxoon MCP as a tool for this Agent. While there are other ways of connecting Klaxoon MCP to Microsoft Copilot Studio, this one is the one we get requested the most from our customers.
Klaxoon MCP lets AI assistants read, organize, and update your Klaxoon Boards from an MCP-compatible client, within your existing Klaxoon permissions. Supported board objects include sticky notes (ideas), text, shapes, and connectors. For a product-level overview, see Introduction to Klaxoon MCP in the Help Center.
Before you start
Make sure you have:
- A Klaxoon account with access to the Boards you want the agent to use
- Organization setting Allow API access by Third Party applications enabled (ask a Klaxoon organization administrator if OAuth or MCP connection fails)
- Access to Microsoft Copilot Studio with permission to create agents and tools
- Permission to create a Klaxoon app in MyApps (typically an organization administrator, one-time per organization)
Step 1: Create a Klaxoon App (administrator, one-time per organization)
Before configuring Copilot, you must create a bridge in Klaxoon to handle security and authentication.
- Log in to Klaxoon and open the MyApps page.
- Click Create new application.
- Register the app with:
- Name: e.g., "Klaxoon MCP for Copilot"
- Company Name, Company website, and Short Description: e.g., "Connection for Microsoft Copilot Studio agents."
- Permissions / Scopes: select the
mcpscope. - Save Credentials: Your OAuth Client ID and Client Secret will be generated. Copy these immediately; you will need them in the next step.
- Important: Leave the Redirect URI field empty for now. You will return to this page to add a specific URL generated by Microsoft later in the process.
- Click Save.
For more detail on app registration, see Create your App. For the mcp scope and custom OAuth apps, see the Installation guide.
Step 2: Create an Agent in Microsoft Copilot Studio with Klaxoon MCP as a Tool
Now, we will register Klaxoon as a functional tool that your AI agent can use to work with Boards.
Navigate to the MCP Tool
-
Log in to Microsoft Copilot Studio.
-
Select Agents from the sidebar and click Create a New Agent (or select an existing one).
-
Open the Tools section
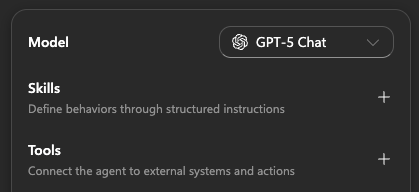
-
Click the + Add button

and select Model Context Protocol (MCP)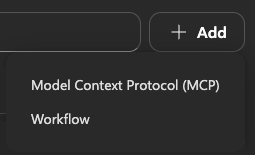
Enter Server Details
- Server Name: Klaxoon MCP
- Server Description: Access and manage Klaxoon Boards: sticky notes, text, shapes, connectors, and board structure.
- Server URL:
https://api.klaxoon.com/mcp
Configure Authentication
-
Under Authentication, select OAuth 2.0.
-
Set the Type to Manual.
-
Paste the Client ID and Client Secret you saved from the Klaxoon App in Step 1.
-
Enter the following URLs exactly:
- Authorization URL:
https://app.klaxoon.com/authorize - Token URL template:
https://api.klaxoon.com/auth/oauth2/token - Refresh URL:
https://api.klaxoon.com/auth/oauth2/token
- Authorization URL:
-
Set Scopes to:
mcp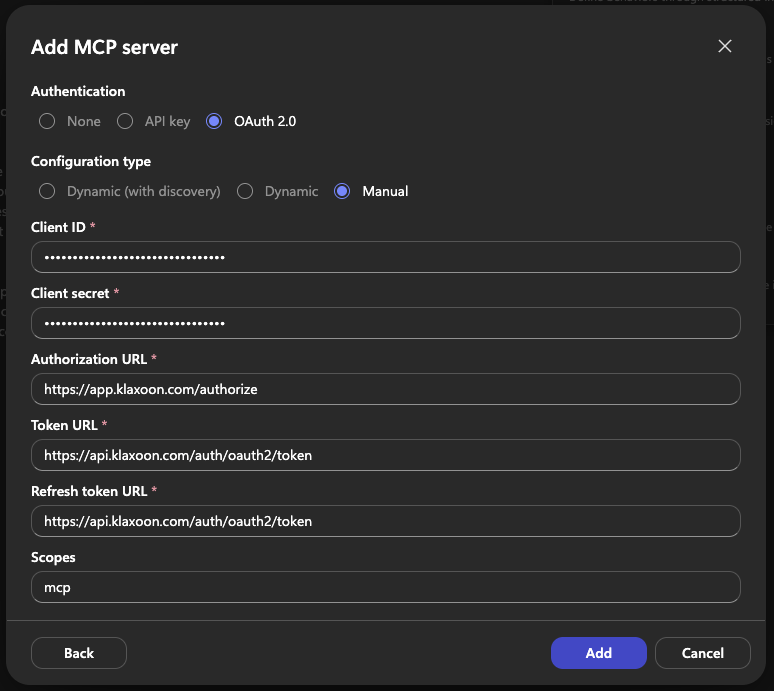
-
Click Add
Note: Unlike some other MCP connectors, Klaxoon requires the
mcpscope on both the Klaxoon app and the Copilot Studio OAuth configuration.
Step 3: Finalize Redirect URI in the Klaxoon App
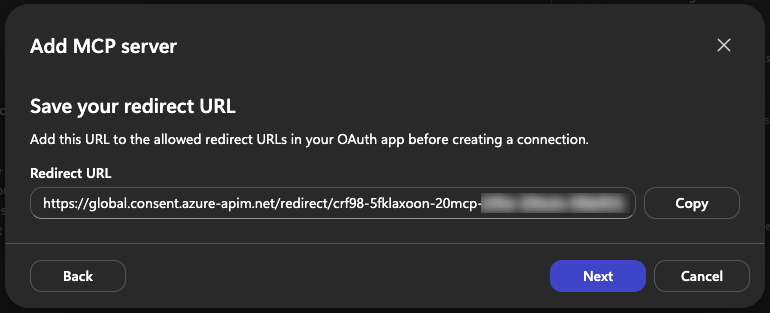
Once you click Create, a modal will appear stating: "Save your redirect URL"
-
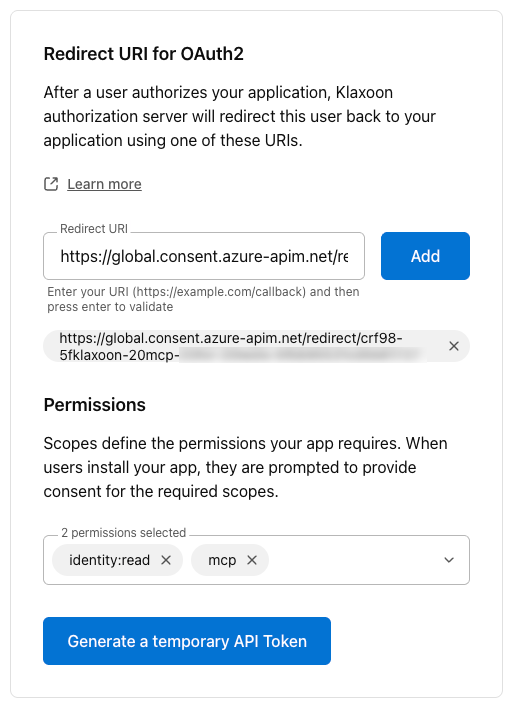
Copy the Redirect URL: Copilot Studio will display a unique Redirect URL in this modal. Copy it to your clipboard.
-
Return to Klaxoon: Go back to your Klaxoon App settings on the MyApps page and open the app you created in Step 1.
-
Paste & Save: Paste the copied URL into the Redirect URI field in Klaxoon and click Add. You should get:
-
At the bottom of the MyApps page, click Save.
Step 4: Connect and Provision the Agent in Microsoft Copilot Studio
With the URLs synced between both platforms, you can now finalize the connection.
-
In the Copilot Studio "Add MCP server" modal, click Next.
-
Under Connection, click Not connected and select Create new connection.
-
Click Create. A Klaxoon sign-in window will open.
-
Enter your Klaxoon credentials and click Authorize to authorize the agent to connect to Klaxoon's MCP server.
-
Now, you should see your tool as connected with a green tick:
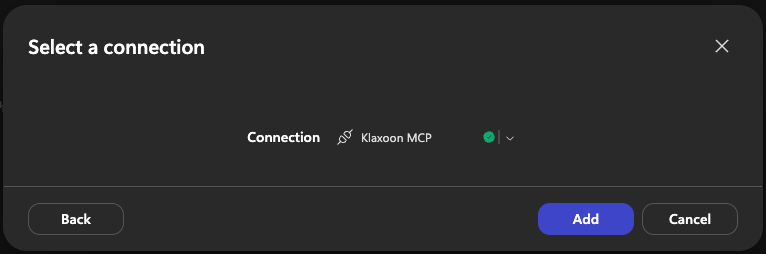
-
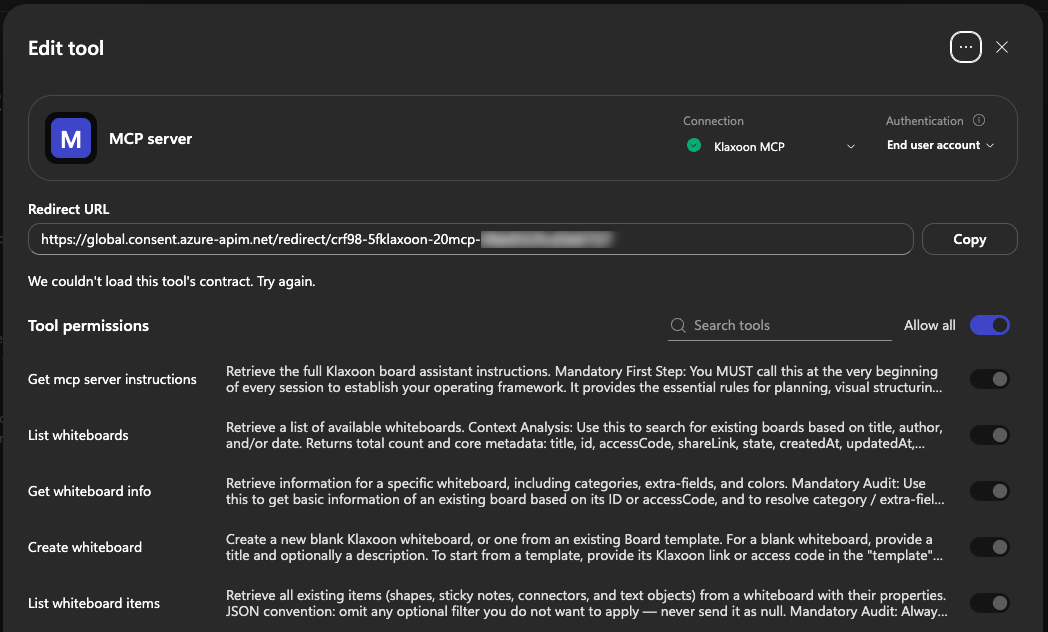
Click Add. Your agent is now provisioned and you will see the full list of available Klaxoon tools if you click on it:
How permissions work
The agent acts within the Klaxoon permissions of the user who connected:
- If you can access a Board, the agent can read the content available to you
- If you can edit a Board, the agent can create or update content through MCP
- If you cannot edit a Board in Klaxoon, the agent cannot edit it through MCP
Testing & Troubleshooting
You can test the integration using the test pane on the right-hand side of Copilot Studio.
Sample prompts
- "List my recent Klaxoon whiteboards."
- "Open my board titled
{title}and summarize the sticky notes as a short action list." - "Create a whiteboard titled PI Planning prep with sections Context, Dependencies, Risks, and Parking lot."
- "On board
{title}, cluster stickies into Must / Should / Could / Won't and add light containers."
More prompt patterns (workshop prep, diagramming, summaries) are in Use-cases & example prompts.
Troubleshooting the "Retry" message
If the agent asks you to connect or shows a retry message during your first test:
- Click Open connection manager in the message.
- Find the Klaxoon MCP connection.
- Click Connect, then click Submit.
- Once the status shows "Connected," return to the agent and retry your prompt.
Other common issues
- Invalid Redirect URI: Confirm the Redirect URL from Copilot Studio is saved exactly in the Klaxoon app (full URL, no trailing-slash mismatch).
- OAuth / API access denied: Ask an organization administrator to enable Allow API access by Third Party applications.
- After changing OAuth settings: Remove the MCP tool connection and recreate it rather than only editing fields. Some clients cache the old configuration.
- Unexpected edits or limited objects: MCP currently supports sticky notes, text, shapes, and connectors. Be specific in prompts (board title, access code, or URL) for better results.
Microsoft Copilot Studio also offers the option to go to Tools > Custom Connector. While this is an available path, we do not officially document it at this time as the MCP method is the optimized standard for this integration.
Related documentation
Help Center
Developer documentation
Updated 4 days ago